Introduction
Monetizing a mobile application is one of the most critical decisions a developer or product team will face. Among all the monetization strategies available (ads, sponsorships, affiliate marketing), In-App Purchases (IAP) remain the gold standard for generating sustainable revenue in mobile apps.
Whether you are building a fitness tracker, a meditation app, a SaaS tool, or a content platform, IAPs allow you to offer premium features, unlock gated content, or provide subscription-based access, all without redirecting users outside your app.
In this comprehensive guide, I will walk you through everything you need to know about implementing in-app purchases in Flutter mobile apps: from understanding the different purchase types to writing production-ready code with RevenueCat, testing in sandbox environments, and avoiding the most common pitfalls.
What Are In-App Purchases?
In-app purchases are transactions that happen inside your mobile application, processed through the platform's native billing system: Apple's StoreKit on iOS and Google Play Billing on Android.
Unlike third-party payment processors (Stripe, PayPal), IAPs are mandatory for digital goods and services sold within apps distributed through the App Store or Google Play. Both Apple and Google take a 15-30% commission on every transaction.
Why Use In-App Purchases?
- Trust: Users trust the native purchase flow: Face ID, fingerprint, and stored payment methods make checkout seamless.
- Compliance: Apple and Google require IAPs for all digital goods (non-physical products).
- Subscription Management: Automatic renewals, grace periods, and billing retry are handled by the store.
- Global Reach: Support for 175+ countries with localized pricing and currencies.
Types of In-App Purchases
Understanding the different IAP types is essential before writing a single line of code. Each type serves a different business model.
| Type | Description | Refundable | Example |
|---|---|---|---|
| Consumable | Can be purchased multiple times, depleted after use | No | Coins, gems, extra lives |
| Non-Consumable | Purchased once, permanently unlocked | Yes (within policy) | Remove ads, unlock a feature, premium filter pack |
| Auto-Renewable Subscription | Recurring billing until cancelled | Prorated | Monthly/yearly pro plan, streaming access |
| Non-Renewing Subscription | Fixed-duration access, does not auto-renew | No | Season pass, 30-day trial access |
Which Type Should You Choose?
For most Flutter apps in 2026, the auto-renewable subscription model dominates. It provides predictable recurring revenue and is the preferred model for SaaS-style apps. If your app sells virtual goods (games, tokens), consumables are the way to go.
Architecture Overview
Before diving into code, it is important to understand the high-level architecture of how in-app purchases flow through your system.
The IAP Transaction Flow
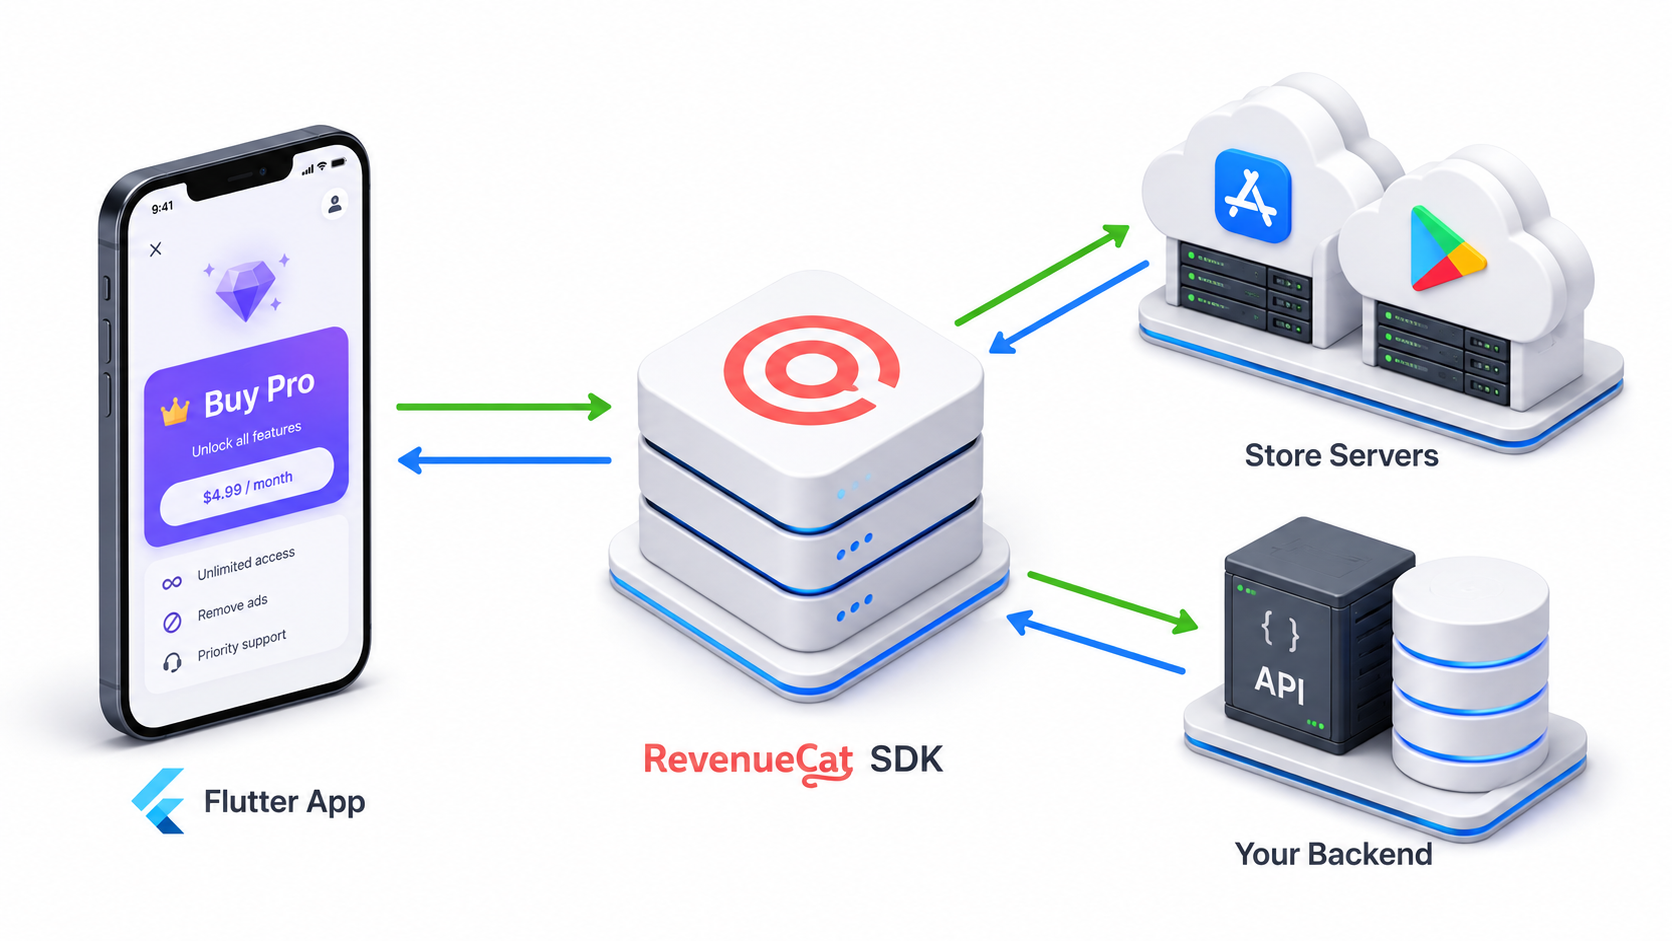
- User initiates purchase → Flutter app calls RevenueCat SDK
- RevenueCat forwards request → Native store processes payment
- Store confirms transaction → Receipt is validated server-side
- RevenueCat updates entitlements → App grants access to premium features
- Webhooks notify your backend → Sync subscription status with your database
Why RevenueCat?
You could implement in-app purchases using the raw in_app_purchase Flutter plugin. However, managing receipt validation, subscription state, grace periods, refunds, cross-platform consistency, and analytics on your own is an enormous engineering burden.
RevenueCat abstracts all of this complexity into a single SDK with a dashboard. Here is why it is the industry standard:
| Feature | Raw in_app_purchase Plugin | RevenueCat |
|---|---|---|
| Receipt Validation | You build your own server | Handled automatically |
| Subscription State | Manual tracking | Real-time CustomerInfo |
| Cross-Platform Sync | Custom backend needed | Built-in |
| Analytics & Metrics | None | MRR, churn, trials dashboard |
| A/B Testing Pricing | Not possible | Offerings & Experiments |
| Webhook Events | Not available | Renewals, cancellations, refunds |
| Pricing | Free | Free up to $2,500/mo revenue |
Step-by-Step Implementation
1. Prerequisites
Before writing any code, ensure these are configured:
- Apple Developer Account ($99/year) with the Paid Applications agreement signed in App Store Connect
- Google Play Console Account ($25 one-time) with a merchant account linked
- RevenueCat Account (free) at revenuecat.com
- Flutter SDK 3.x or later installed
2. Store Product Configuration
Apple App Store Connect
- Navigate to My Apps → Your App → Subscriptions (or In-App Purchases)
- Create a Subscription Group (e.g., "Pro Access")
- Add subscription products:
pro_monthly- $4.99/monthpro_yearly- $39.99/year
- Fill in localized display names and descriptions
- Submit for review
Google Play Console
- Navigate to Monetize → Products → Subscriptions
- Create a subscription with the same Product ID:
pro_monthly - Add a Base Plan with monthly pricing
- Repeat for
pro_yearly - Activate the products
3. RevenueCat Dashboard Setup
- Create a new project in RevenueCat
- Add your iOS and Android apps with their bundle IDs
- Upload your App Store Connect API Key (
.p8file) and Google Play Service Account JSON - Create Entitlements (e.g.,
premium_access) - Create Offerings (e.g., "default") and attach your products
- Copy your Public API Keys (one per platform)
4. Flutter Project Setup
Add the RevenueCat SDK to your pubspec.yaml:
dependencies:
  purchases_flutter: ^8.0.0
iOS Configuration
Update your ios/Podfile minimum target:
platform :ios, '15.0'
Enable the In-App Purchase capability in Xcode:
- Open
ios/Runner.xcworkspace - Select your target → Signing & Capabilities
- Click + Capability → Add In-App Purchase
Android Configuration
Ensure your android/app/src/main/AndroidManifest.xml has the billing permission:
<uses-permission android:name="com.android.vending.BILLING" />
Set the launch mode to singleTop in your <activity> tag to prevent purchase flow interruption:
<activity
    android:name=".MainActivity"
    android:launchMode="singleTop"
    ...>
5. SDK Initialization
Initialize RevenueCat early in your app lifecycle, typically in main.dart:
import 'dart:io';
import 'package:flutter/material.dart';
import 'package:purchases_flutter/purchases_flutter.dart';

Future<void> main() async {
  WidgetsFlutterBinding.ensureInitialized();

  final config = PurchasesConfiguration(
    Platform.isIOS
        ? 'appl_YOUR_IOS_API_KEY'
        : 'goog_YOUR_ANDROID_API_KEY',
  );

  await Purchases.configure(config);

  runApp(const MyApp());
}
6. Fetching Available Products
Retrieve the offerings you configured in the RevenueCat dashboard:
Future<List<Package>> fetchOfferings() async {
  try {
    final offerings = await Purchases.getOfferings();

    if (offerings.current != null) {
      return offerings.current!.availablePackages;
    }

    return [];
  } on PurchasesError catch (e) {
    debugPrint('Error fetching offerings: ${e.message}');
    return [];
  }
}
7. Making a Purchase
Trigger the native purchase flow when the user taps a "Subscribe" button:
Future<bool> purchasePackage(Package package) async {
  try {
    final customerInfo = await Purchases.purchasePackage(package);

    // Check if the entitlement is now active
    if (customerInfo
        .entitlements
        .all['premium_access']
        ?.isActive == true) {
      return true; // Purchase successful
    }

    return false;
  } on PurchasesError catch (e) {
    if (e.code == PurchasesErrorCode.purchaseCancelledError) {
      debugPrint('User cancelled the purchase');
    } else {
      debugPrint('Purchase error: ${e.message}');
    }
    return false;
  }
}
8. Checking Entitlement Status
Gate premium features by checking the user's active entitlements:
Future<bool> isPremiumUser() async {
  try {
    final customerInfo = await Purchases.getCustomerInfo();
    return customerInfo
        .entitlements
        .all['premium_access']
        ?.isActive == true;
  } catch (e) {
    debugPrint('Error checking entitlement: $e');
    return false;
  }
}
9. Restoring Purchases
Always provide a "Restore Purchases" button (Apple requires this for App Store approval):
Future<void> restorePurchases() async {
  try {
    final customerInfo = await Purchases.restorePurchases();

    if (customerInfo
        .entitlements
        .all['premium_access']
        ?.isActive == true) {
      // Restore successful - unlock premium features
    } else {
      // No active purchases found
    }
  } on PurchasesError catch (e) {
    debugPrint('Restore error: ${e.message}');
  }
}
Testing In-App Purchases
Never test IAPs in production. Both Apple and Google provide sandbox environments.
iOS Sandbox Testing
- In App Store Connect, create a Sandbox Tester account under Users and Access → Sandbox
- On your test device, sign out of the App Store and sign in with the sandbox account
- Purchases made in sandbox mode are free with no real charges.
- Subscription renewal times are accelerated (monthly = 5 minutes).
Android Internal Testing
- In Google Play Console, navigate to Testing → Internal Testing
- Add tester email addresses to the testers list
- Upload your signed APK/AAB to the internal testing track
- Testers can install via the internal testing link
- Use test card numbers (e.g.,
4242 4242 4242 4242) for purchases
Subscription Renewal Schedule (Sandbox)
| Production Duration | Sandbox Duration (iOS) | Sandbox Duration (Android) |
|---|---|---|
| 1 week | 3 minutes | 5 minutes |
| 1 month | 5 minutes | 5 minutes |
| 3 months | 10 minutes | 5 minutes |
| 6 months | 15 minutes | 15 minutes |
| 1 year | 30 minutes | 30 minutes |
Best Practices for Production
1. Server-Side Receipt Validation
Even though RevenueCat handles receipt validation, if you run your own backend, set up webhooks to receive real-time events:
POST https://yourapi.com/webhooks/revenuecat

Events: INITIAL_PURCHASE, RENEWAL, CANCELLATION,
        BILLING_ISSUE, PRODUCT_CHANGE, EXPIRATION
2. Handle Edge Cases Gracefully
- Network failures: Cache the last known entitlement state locally
- Pending transactions: On Android, purchases can be "pending" (e.g., waiting for parental approval)
- Grace periods: When billing fails, users get a grace period before losing access, so do not lock them out immediately.
- Refunds: RevenueCat sends
CANCELLATIONwebhooks to revoke access accordingly.
3. Pricing Strategy
- Offer a free trial (3-7 days) to reduce friction
- Use annual plans with a visible discount vs. monthly to increase LTV
- Leverage RevenueCat's Experiments feature to A/B test pricing tiers
- Show prices in local currency using
package.storeProduct.priceString
4. App Store Review Guidelines
- Always include a Restore Purchases button
- Clearly communicate subscription terms before the purchase prompt
- Link to your Terms of Service and Privacy Policy on the paywall screen
- Do not use misleading language ("free" when there is a trial that auto-renews)
Common Pitfalls and Solutions
| Pitfall | Solution |
|---|---|
Products return empty in getOfferings() | Ensure products are "Ready to Submit" in the store console and linked in RevenueCat |
| Purchase completes but entitlement is not active | Verify the product is attached to the correct entitlement in RevenueCat dashboard |
| App crashes on purchase on Android | Set android:launchMode="singleTop" in AndroidManifest.xml |
| Sandbox purchases do not work on iOS | Ensure device is signed in with a Sandbox Tester account (not personal Apple ID) |
| Users lose access after app reinstall | Implement restorePurchases() on app startup or first launch |
Google Play returns BillingResponse.SERVICE_UNAVAILABLE | User's device does not have Google Play Services: show a friendly error message |
| Apple rejects the app for missing restore button | Add a visible "Restore Purchases" button on your paywall |
RevenueCat Dashboard Metrics
Once your app is live, RevenueCat provides a rich analytics dashboard to track your monetization performance:
| Metric | What It Tells You |
|---|---|
| MRR (Monthly Recurring Revenue) | Total predictable monthly income |
| Active Subscribers | Number of currently paying users |
| Trial Conversion Rate | % of free trial users who convert to paid |
| Churn Rate | % of subscribers who cancel per period |
| LTV (Lifetime Value) | Average revenue per subscriber over their lifetime |
| Refund Rate | % of purchases refunded, keep below 2% |
Conclusion
Implementing in-app purchases in Flutter does not have to be overwhelming. By leveraging RevenueCat as your subscription management layer, you can focus on building great features while the SDK handles the complexity of store APIs, receipt validation, cross-platform synchronization, and analytics.
The key takeaways from this guide:
- Choose the right purchase type for your business model: subscriptions for recurring revenue, consumables for virtual goods.
- Use RevenueCat instead of raw store APIs to save months of backend development.
- Configure products in both stores before writing any Flutter code.
- Test thoroughly in sandbox environments before going live.
- Follow App Store guidelines to avoid rejection: restore button, clear terms, and honest pricing.
- Monitor your metrics: track MRR, churn, and trial conversion to optimize your monetization strategy.
In-app purchases are the most effective way to monetize a mobile app sustainably. Get the foundation right, and your Flutter app can generate predictable, scalable revenue from day one.
Need help setting up subscriptions or paywalls in your mobile app? I implement secure, cross-platform subscription systems, paywalls, and cross-platform entitlements in Flutter using RevenueCat or native billing. Book a meeting to monetize your app.
Written by Moeen Ahmad, Senior Software Engineer working across mobile apps, backend systems, cloud deployments, and AI-powered products. I write about practical engineering, real project lessons, and building software that actually ships.
Interested in working together?
Let's discuss your project and explore how I can help bring it to life.